Link To Me!


& for my CT Ladies

CU Licenses


I CT For


My CT Team


Forums I LOVE

Tut Writers Inc

Networked Blog
Wednesday, February 20, 2013
PTU Tut Rock Rebell (CT for Berry Applicious)
Tutorial Time Again!!!
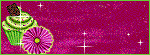
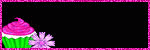
Here's a Preview of the taggie we will be making today:

For this tutorial you will need:
Gimp
Gimp
Lysira's Graphic World's Rock Rebell kit which you can find at Berry Applicious
Tube of choice. I am using Dead Sexy Girl from Ismael Rac You need a license to use these tubes and can obtain one thru his store (linked above)
Font and Mask of choice
Open a new canvas, 600x600, background white
Open as layers frame 2 and resize to 403x400 and place towards the center of your tag
Open as layers paper 12 and move this layer below your frame layer
fit the paper layer to the canvas
on the frame layer use the magic wand too to select inside the frame and grow the selection by 6
make your frame layer active and and select the inverse and cut
Open as layers bougainville02 and move below your paper layer
place to the left so that the flowers stick out on the top side
Duplicate this layer and mirror flip it and place opposite the first one on the other side of the frame
Make your frame layer active again so the elements we place will be on top of it
Open as layers cherry skull cupcake and scale down to 120x160
place to the bottom left hand side of your frame
Open as layers curly ribbon and move this layer below the cupcake layer and place to the bottom of the frame overlapping the bottom bit of it
Open as layers flame and place behind the cupcake layer and ribbon layer
Open as layers flower 2 and scale down to 100x100. move this layer above your top layer and place to the right of the cupcake slightly overlapping it
Open as layers glitter trail and move this layer under the ribbon layer and place to the bottom of the frame slightly overlapping
Open as layers ice skull and scale down to 98x187. Move this layer to the top and place to the right of the flower
Open as layers kitten and scale down to 200x238. move this layer under the cupcake layer and place slightly to the right of it
Open as layers netting 1 and move to the bottom of your layers
Open as layers pierced lips and scale down to 145x103. place this layer under the ice skull layer and place to the right of it slightly overlapping
Open as layers skull gum and scale down to 143x120. place below the pierced lips slightly overlapping
Open as layers skull polish and scale down to 55x163 and place under your pierced lips layer slightly to the right
Make your top layer active again and open your tube of choice as a new layer and place to the right of your tag. using the bucket fill tool on mode: color, color your tube with black so that it is now in black and white
Make your paper layer active and open your close up of the tube. Mirror flip this layer.
Fit your tube inside the frame by selecting the paper layer and choosing layer>transparency>alpha to selection. on the tube layer select the inverse and cut
Make your background layer active and and open your mask of choice and apply paper6
Delete your mask layer
Add dropshadows to all layers except your paper layers
Add name and copyright and delete your white background layer.
save as a .png
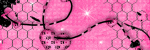
Tada! Awesome taggie made!
Subscribe to:
Post Comments
(Atom)
This is really interesting, You're a very skilled blogger. I have joined your rss feed and look forward to seeking more of your magnificent post. Also, I have shared your site in my social networks!
ReplyDeletemy page - nethosting Reviews
I am not sure where you are getting your information, but great topic.
ReplyDeleteI needs to spend some time learning more or understanding more.
Thanks for excellent info I was looking for this information for my mission.
Feel free to surf to my page: host-monster Ratings