Link To Me!


& for my CT Ladies

CU Licenses


I CT For


My CT Team


Forums I LOVE


Tut Writers Inc

Networked Blog
Tuesday, December 31, 2013
Hey
I'm just popping in for an update.
I really apologize that I haven't been updating, & that I haven't gotten a kit out in a while. I actually have 2 (a Halloween and a Christmas one) that I just haven't gotten around to uploading to the stores yet with all the chaos.
My purrincess, Elphaba, passed away November 1st. And I knew she was sick a little while before then, so I really haven't been myself for a good while. I'm just starting, really, getting...well, not back to normal, but better at dealing with it. I'm really going to try in the new year to be more productive. I'm not going to promise anything, because I don't want to disappoint, but I really am going to try.
I wish you all a happy and healthy new year!

Tuesday, October 15, 2013
CT Page Layout - Welcome to Spooksville
I made something friggin adorable!!!
Once again, I am using the fabulous kit by Kitties Sinful Designz, "Off to Spooksville" which you cana get exclusively at Mystical Scraps.
I super duper heart this kit!!!! The colors are so vibrant and fun and perfect for a friendly halloween! I think perfect for scrapping pics of your little monsters in their costumes!!
Since I have no lil human monsters of my own, I used 2 of my furry ones in this layout here:

Isnt that adorable? I love the little skull people in the van! :)
Ok that's it for now!

Sunday, October 13, 2013
PTU CT Tut - Spookyville
For this tutorial I am using the tagger sized kit "Off to Spooksville" from Kittie's Sinful Designz, the artwork of Elias Chatzoudis (I purchased these tubes from the now closed PTE but you can find his tubes now at Elias Art Shop) & a mask (any will do, it's up to you)
This tutorial was written using Gimp but I'm sure any graphic design program will suffice.
Lets get started!!!
Open a new canvas 600x600, background white (you will delete this layer later)
Open as new layer element 68.png and scale down to 465x465
Move to the bottom left hand side of your canvas
Open as new layer papers 1, 2 & 3
Move these layers below element 68.png
Using the magic wand tool, select inside one of the frames. Expand the selection by 6px and then make one of the paper layers active
Select the inverse and cut. Repeat this for the other 2 frames with the remaining papers.
Open as new layer element 78.png and move this layer to the bottom
Open as new layer element 30.png and scale to 370x370. Place this element towards the top left hand side of your canvas and move the layer to the bottom of the stack, but above element 78.png
Open as new layer element 3.png and scale down to 204x307. Place to the lower right hand side of the frames, slightly overlapping
Open as new layer element 7.png and scale down to 95x171. Place to the lower left hand side of element 3.png
Open as new layer element 33.png and move this layer right above the frame layer & place at the bottom of the frame
Open as new layer element 15.png and scale down to 188x106. Place to the right hand side of the tree
Open as new layer element 16.png and scale down to 160x118. Place above the right-most frame
Open as new layer your mask of choice. colors > invert. layer > transparency > color to alpha.
Open as new layer paper 4. fit to canvas
Make your mask layer active again and go to layers > transparency > alpha to selection
Making the paper layer active again, select the inverse and cut
Delete mask layer
Now it is time to add your tube(s)
Open as new layer your first tube & scale to your liking. This tube will be placed in the top most frame and stick out the top.
Move your tube layer below your frame layer. Use the eraser tool to remove bits of the tube that stick out on the bottom and sides
Now duplicate your frame layer and move one copy below your tube.
On the top frame layer, use the eraser tool again to remove the top of the frame to give the effect of the tube popping out.
Open as new layer your second tube and place this layer below the bottom frame layer.
Place inside the bottom-most frame and delete bits sticking out of the frame
Repeat this with your third tube in the last frame.
Add drop shadows to all elements except the top frame layer (and papers)
Add copyright and name.
Delete your white background layer & save as a .png file
Tada!!!! yay taggie!!
Hope you enjoyed this tutorial!

Thursday, October 10, 2013
Awesome Tut using my Rumor Has It Kit

Megan at Devilish Canadian Creations made this gorgeous tag with my kit and has a tutorial for it which you can find on her blog HERE.
Thank you, Megan!
It's lovely!!

Monday, August 5, 2013
It's My Birthday Bitches!
sorry just had to share. I'm only special for one day
...side note Marylyn Monroe died on my birthday, but many years before so, alas, I am not her reincarnation (though that would be the shit, right?)

also I've lost almost 30lbs since my last birthday and am finally feeling like myself again (AKA I fit in my clothing from high school)
Now even tho it is my birthday and I should be getting the presents...the first 3 to comment with their favorite PTU kit and what they like about it (detail is important) will be getting it for FREE day after my birthday (Aug 5 and I live in the Eastern Standard Time Zone)
*note the free kits will be sent out late tomorrow or even the day after cus Ima need to sober up...it is my birthday after all! lmao
Friday, August 2, 2013
so.....
I know I suck and I haven't come up with anything in a long time but that is going to change!
I have finally moved to a new apartment and got on a good schedule so I'm not feeling all groggy during the day!
& just my luck...I won free advertizing for a month!!!!
this is the First Ad
I'm excited!
also, my birthday is coming up...3 more days not counting today :D
I want prezzies for my birthday from you! use my kits (PTU or FTU) and make me tags with "Pandora" on them! OMG that would be so awesome!!!!
you can email them to me @ Gmail or upload to photobucket or one of those sites and leave the url in a comment here!
Please please please do it! It'll make me so happy and then I'll show them all off on my blog with links back to who made what!!!

Tuesday, May 28, 2013
I Heart My New Layout!
Thank you so so much Kimmie for my awesome new blog layout!!!! I friggin love it girl!!!!!
& I maked myself a new siggie to match....maybe I'll make a blinkie to match as well....eventually...I'm lazy, lol

Thursday, May 23, 2013
Goth Girl Glam Now in Stores! & a CT tag!
This kit is now available for purchase at the stores listed on the left hand side of my blog

it's tagger sized of course and contains 50 various elements, 2 frames, and 10 papers
& here's an awesome tag from Annie @ Narcotic Designs using the kit:

thank you hun! I love it!!!
xoxo,

Wednesday, May 22, 2013
Coming Soon!
I made a new kit soon to be available in stores!!!
It's called Goth Girl Glam! I was inspired by one of my best friends and my old fashion sense (that hasn't faded completely, I'm just too complicated for one look :P... I'll always be a lil' goth girl at heart!)
Here's a preview:

The kit is, of course, tagger sized and includes 50 various elements, 2 frames, and 10 papers (800z800)
It hasn't been released yet but will be in my stores within the week!
Hope you like!
xoxo,

Wednesday, April 24, 2013
CT Layout 2 for Berry Applicious
I made this layout using Touched by a Butterfly's super adorable kit, Dexter's Dinosaurs which you can find HERE at Berry Applicious!
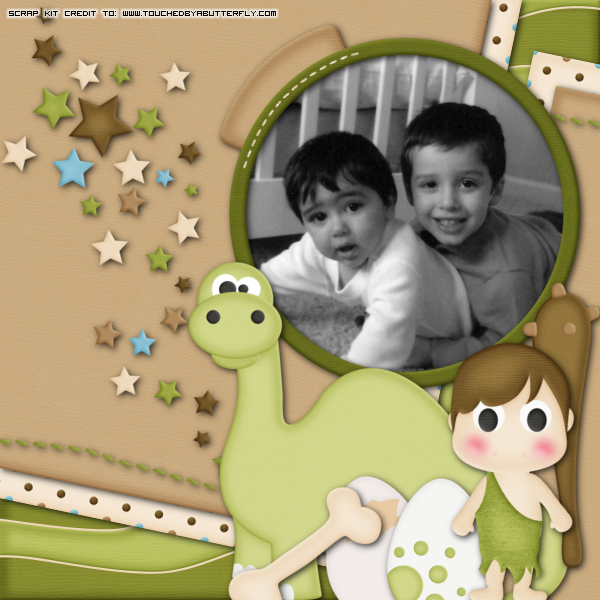
The cuties pictured are my baby cousins, Jack & Max :)
Thank you so much for the adorable kit to work with!
xoxo,

Tuesday, April 23, 2013
CT Layout for Berry Applicious!
I made this layout using Touched by a Butterfly's super adorable kit, Dexter's Dinosaurs which you can find HERE at Berry Applicious!

The cutie pictured is my baby cousin, Jack, this past halloween when he dressed as a dino :)
Thank you so much for the adorable kit to work with!
xoxo,
Monday, April 22, 2013
More CT Tags from Dee
Dee @ Dee's Deelights Made these 2 awesome taggies with my Kitteh Lurve Kit


Thank you for the awesome taggies Dee!!!
xoxo,


Thank you for the awesome taggies Dee!!!
xoxo,

Sunday, April 21, 2013
CT Tags from my FB Freebie
My CT team played with my FB Fan Freebie kit and came up with some awesome stuff
This first set is a FB Timeline Combo from Cindy @ Chica's Creationz


& this here taggie is from Pamela @ Redefined Designs

& she has a tutorial for this tag which you can find on her blog Here!
& also Jessie on Uniquely Beautiful Creations on fb made this one for me:

Friday, April 19, 2013
New PTU Kit Beach Blast
There's a new kit from me in stores!!!
I'm ready for summer so here's what ya get!

This kit contains 55 various elements, 5 frames, and 10 papers
& it's tagger sized
Hope you enjoy!
xoxo,

Thursday, April 18, 2013
Awesome CT Tags from Dee
Dee @ Dee's Deelights Made these 2 awesome taggies with my Lust for Love kit


Oh I just LOVE them!!! Thank you so much Dee!!!
xoxo,

Wednesday, April 17, 2013
CT Tags for Redefined Designs
For this tag I used her kit Kiss My Attitude. It's a totally awesome Black and White kit and definitely packs in a whole lotta attitude!!
For this one I used her kit 50 Shades of Rock. It's a totally rad rocker kit with lots of music inspired elements!
You can check out Pamela's blog, Redefined Designs, and see the stores she sells at listed to the left hand side of her blog!
xoxo,

Tuesday, April 16, 2013
CT Tags for Pure Reality Designs!
This first tag was made with her Exclusive Barbara Kit, to match the Barbara tube from Verymany (which I used, of course, lol)
& this second tag was made with her Spring Blossoms Kit
You can find these kits at any of the stores she sells at listed to the left hand side of her blog:
xoxo,

Monday, April 15, 2013
CT Tag for Hania's Designs (Berry Applicious)
I used Hania's Designs kit, Estrella to make these tags


This kit is pretty darn awesome! You can find it at Berry Applicious
xoxo,

Sunday, April 14, 2013
FB Fan Freebie
I did what I said and made a FB Freebie Kit!

You can find this kit @ Pandora Designs Facebook Fan Page
Hope you like it! & please leave some love if you download!!
xoxo,

Wednesday, April 10, 2013
CT Results from Punk Rock Life
I don't remember if I ever posted the awesomeness some of my CT have made with my Punk Rock Life Kit

This is a FaceBook Timeline Combo Set made by Ann Marie of Narcotic Designs


Here's a FB timeline Cover made by Cindy of Chica's Creations

This tag was made by Kimmie of Kimmilicious Kreationz

And lastly but not leastly, this is a Facebook timeline combo made by Pamela of Redefined Designs


I HEART my CT!!!! They are amazing ladies and some of the best online friends I have ever had the pleasure of meeting (some even IRL [Ann Marie & Pamela <3 p="">

I thank you ladies from the bottom of my heart for being such amazing friends and creating such awesome tags with my kits!!!!
xoxo,

Subscribe to:
Posts
(Atom)